I was faced with an engine rebuild after I had a crankshaft
bearing fail at 45,000 miles. I noticed when I removed the cylinder head that I
had a groove from the copper fire ring in the composite gasket that I was using.
 |
| Indent is visible on exhaust (left hand) side |
I
didn’t want to skim the head because it was flat, and I didn’t want to
exacerbate the problem by using another copper ring gasket. After talking to
some old timers I came up with another solution: make a copper head gasket.
The main advantage to using a copper gasket is reusability.
A copper gasket can be reheated and reused an infinite amount of times. They are also stronger and less likely to suffer a blowout than a composite gasket. Since
I’ve blown gaskets in the past I thought it was worth trying.
No one sells copper gaskets for Heinkels, so I made one myself (and you can too). Here's how:
Selecting the Copper: You can’t go to just any store to buy
sheets of copper. I needed copper that was about the same thickness as the gasket
I had been using. The best source of copper I found was roof flashing from my
local lumberyard. It was available in
.030 thickness and widths of 6,8,10,and 12 inches. I decided to purchase a
foot-long piece of 10” copper that I could use to make up to 4 gaskets (in case
I made an error).
 |
| Copper Sheet for Making a Head Gasket |
Determining the Design: I had a regular head gasket that I used as a template. I
traced the holes onto a piece of thin plywood.
 |
| Using Heinkel Factory Gasket as a Template |
 |
| Centering Marks for Holes |
Then I realized I could cut them
all at once by stacking alternating layers of thin plywood and copper. The plywood would prevent (or minimize) tearout of the copper and keep the sheets flat. It would be a more risky approach but would save time,
 |
| A copper and plywood sandwich |
 |
| Alternating layers for the gaskets |
I cut the copper with aviation snips and the plywood with a
chop saw into 4 corresponding plates, then stacked and attached them.
Cutting the Gasket: Copper is pretty soft but I don’t have metalworking tools. I do have wood working tools, so I decided to use them. If you are going to try this it would be very helpful to have a drill press. I stacked the "sandwich" and then attached the assembly with drywall screws to a piece of plywood, which I then clamped onto my drill press table.
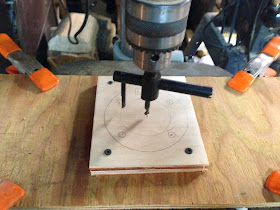
To cut the big hole I used a circle cutter.The circle cutter features an adjustable arm that lets you precisely set the hole size.
 |
| Circle cutter mounted in drill press, with assembly clamped to work table |
 |
| The circle cutter in action on the Heinkel head gaskets |
 |
| Cutting the stud holes for the gasket |
Cutting out the pushrod shafts was going to be a little
tricky. I decided to drill out the outline with a small diameter bit and then
use a file to smooth out the holes
 |
| Trimming the pushrod holes for the Heinkel head gasket |
 |
| Comparing holes to factory gasket |
 |
| Trimming the gasket to final shape in the bandsaw |
Now it was time to take the sandwich apart and see how I
did: Not too bad!
 |
| Test fit of Heinkel Gasket |
Two of the stud holes were a little tight, so I elongated them
with a Dremel. I also had to ease the edges of the cuts. Because I used a saw
(rather than a punch like a regular gasket maker would do) I had a tiny edge of copper protruding from the saw kerf. I cleaned this up with a Dremel stone and the
basic gasket was done.
Annealing the Gasket: While copper is soft, you should anneal it to make it pliable
and reusable. In my mind this is the real benefit of using a copper gasket. The
theory is that each time you want to reuse it you anneal it which makes it soft
and compressible again.
To anneal the gasket you heat it with a torch until it is
red hot, then cool it quickly. I used MAP gas instead of propane, which heated
the gasket up quickly.
 |
| Annealing the copper Heinkel head gasket by making it red hot |
Once it was done I dropped it in a bucket of cold water to
cool it quickly.
 |
| Cooling quickly is the second step of annealing |
These gaskets are done, except for cleaning off the soot.
 |
| Completed Heinkel copper head gaskets |
Installing the gaskets: I installed the gasket using a layer of Hylomar Blue (a non-settting sealer designed for gasket sealing applications). I torqued it a little higher than the 22 lbs for a normal gasket. The next day I ran a compression test and the engine passed at 120 lbs.
This engine won't be on the road foe some time, so you'll have to wait for a full report. I don't expect any issues. The cost was relatively inexpensive (probably $4.00 each).
This engine won't be on the road foe some time, so you'll have to wait for a full report. I don't expect any issues. The cost was relatively inexpensive (probably $4.00 each).

No comments:
Post a Comment