 |
| An Elusive Heinkel-I Steering Wheel Center |
Over the past few years I’d investigated
3D printers for work. If you’re not familiar with them, they print plastic three
dimensional objects tiny layers at a time from a computer file you design or
purchase. Think of a laser-guided continuously extruding hot glue gun and
you’ll have a pretty good idea of how they operate.
As it turns out, my local
library (of all places) has a 3D printer. Why not design and print my own
steering wheel center? Since I’m always
up for a new challenge I decided to try it.
Here was the process I
intended to follow:
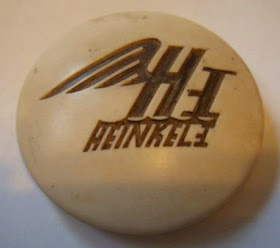
- Make a scanned computer model of my existing Heinkel steering wheel center
- Manipulate the design to transform the “Heinkel” Logo into a “Heinkel-I” logo
- Print the part
- Paint it
- Install in my car.
In the commercial world 3D
printers have been making inroads for several years and are well established in
many industries as prototyping tools. While the printers are slow, the end-to-end
elapsed time of producing a 3D prototype is much faster than the “old” method
of designing, sending drawings to a machine shop, having molds fabricated, and
so on. 3D machines used for these tasks tend to be expensive ($25,000 and up)
and out of the reach of most hobbyists.
There’s an active do-it-yourself
community using 3D printers at a consumer level. These printers are available starting at
$150, with the sweet spot being the $750- $2,500 market. In this price range
there are a variety of features but to be honest they pretty much all operate
the same way, with the differences (at least to me) being packaging or the
support and user community that has grown up around them.
But let’s get back to printing.
Question one: how would I create an image that I could print? My first thought
was scanning. I was using a Makerbot printer, and Makerbot makes a 3D digitizer.
A digitizer lets you scan an image from multiple angles, and then the software embedded
in the device takes over and creates a 3D model. Piece of cake?; not really. As
it turns out the local Makerbot “boutique” did not have a digitizer, and the
people they referred me to said theirs was broken. Reading between the lines I
got the sense that digitizers do not work very well.
 |
| The Makerbot 3D Replicator |
My next approach was to use an
app for my iPad to scan the part and create a file. Here’s how this works (in
theory): Place the object on a flat surface. Take about 30 or 40 pictures from
various angles and the software does the rest.
This didn’t work either. The
software doesn’t work with shiny objects.
 |
| Using an iPad scanning program on a Heinkel part |
The final option was to create
my own design using CAD (Computer Aided Design) software. Several programs are available
for little or no cost that you can use to create images. Two of the most
popular are Sketch Up and Tinkercad. Sketch Up is a downloadable program that
you install on your computer, and Tinkercad is a hosted application that you
use over the internet. Sketch Up, even though a professional would tell you is
a simplified version of CAD software, still has quite a learning curve.
Tinkercad is easier to use, but has an odd interface with unconventional
commands so it too takes some to master.
As it turns out I happen to be
very lucky. My daughter was home from her graduate school program and
volunteered to design the piece for me. If you’ve been reading my blog you’ve
seen her work before; she wove my cargo net (http://heinkels.blogspot.com/2013/03/cargo-net.htmlhttp://heinkels.blogspot.com/2013/03/cargo-net.html),
made a nice birthday card (http://heinkels.blogspot.com/2013/11/heinkel-birthday-card.htmlhttp://heinkels.blogspot.com/2013/11/heinkel-birthday-card.html),
and also has her own Etsy store where she makes custom ordered 3D fabric
sculptures: (http://etsy.com/shop/gabbysfeltedfriendshttp://etsy.com/shop/gabbysfeltedfriends).
She created the dimensions on paper and then completed some Tinkercad
tutorials.
If you think of the steering
wheel center as a series of geometric shapes grouped together, Tinkercad lets
you make a dome (the top) and merge it with a cylinder (the base) and hollow it
out (I think they call it making a donut).
Once the shape was configured the engraved “Heinkel-I” image had to be
incorporated into the design. There are Heinkel logo files available on the
internet. Kate took one of these images and added the “I” to make it a full “Heinkel-I”
logo. After that it’s a question of
scaling the components and merging in the image. These components are then
merged into a computer document called an “STL” (Standard Tessellation
Language) file.
Once you have an STL image
from the design program you are ready to convert it into the proprietary file
format required by the 3D printer. After you load this file into the computer
program supplied by the printer manufacturer you will have a chance to make
some adjustments. You’ll need to experiment here; I automatically assumed that
I wanted the finest resolution and quality and the program told me it would
take over 29 hours to print! The fastest option was about 90 minutes. In the
end I settled for a finer (but not too fine) resolution that clocked in around
3.5 hours. Once you have this file its time to actually print.
 |
| Heinkel part design in Tinkercad |
 |
| 29 Hours is a bit too long! |
Printing is pretty easy. Load
the file in from a USB memory stick and off you go.
 |
| Watching the printer |
The printer first makes a
“raft” which is a base that the actual object sits on. In our case we also
asked it to produce supports so it could fabricate the lip of the steering
wheel center. Since 3D printing is an additive process (layers upon layers), if
the design doesn’t have enough support it cannot print a cantilevered edge.
After three and a half hours
the printing completed and it looked like this:
I had this notion that I could
print a part and the thing would come out fully baked and ready to use. Strike
that thought from your mind! Once you’ve
completed the print there’s a fair amount of cleanup required.
To fully expose the printed
object you need to remove the raft and supports. The raft was easy enough to
remove. The supports were difficult. There were supports to hold up the edge,
but also supports in the middle to hold up the center of the dome. After about
an hour with a box cutter and X-acto knife these were sufficiently removed.
 |
| Removing the "raft" (top) from the printout |
 |
| Removing the supports from the printour |
 |
| Shortcomings of the process are apparent after printing |
 |
| A little auto body filler |
 |
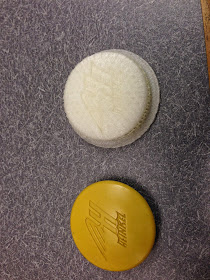
| A Comparison- Printout is on the left |
 |
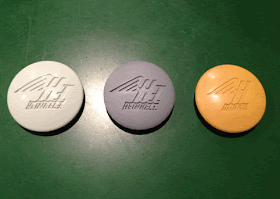
| An original (on loan), the printed copy, and a German reproduction |
What other parts can you print
for a Heinkel? Since most of the car is
metal, and PLA plastic has a melting point of 150 degrees centigrade (300 f),
the uses are limited. But I’ve thought of a few:
- Gear shift indicator plate
- Switch housing covers
- Fusebox cover
- Knobs
- Heater/demister nozzle
- Air filter housing pieces
- Hubcap spinners
- Taillight lenses
If you have any questions about the process you can reach me at smahoneybev at yahoo.com,


So how much $$ do you think this cost in the end? (not including the Printer hardware)
ReplyDeleteAlso- I am curious what caused the "record player grooves" in the final printed piece, I assume a software artifact but also possibly due to lower resolution printing? Thanks for posting this, it was very informative and looks like fun.
Just $2. The grooves are related to resolution chosen. At the highest resolution available it was going to take 29 hours.
Delete