Adjustments are the
final step in having better brakes. We’ll start with bleeding the brakes and wrap
up with adjustments.
If you've installed a
new master cylinder or wheel cylinders you’ll have to bleed out the air that is
now in the system. As I mentioned in a previous post, air in the system leads
to bad performance, as air compresses much more than liquid brake fluid.
One way to get rid of
air is to vacuum it out using a Mighty Vac or similar product. To do this you
attach the Mighty Vac to a bleeder port while the port is still closed, pump
the Mighty Vac about 30 times to build a up good vacuum pressure, and then
crack the bleeder valve open. This will immediately start to suck fluid
and air out of the system. The problem with this method is that it can suck the
reservoir dry and reintroduce air back into the braking circuit. If you have a
friend helping you can keep the master cylinder topped up and you might have a
chance of successfully completing the process. I’ve tried it by myself and
found it very difficult. As appealing as it sounds I would pass on this method.
Another option is to use
the Mighty Vac as a pump and pump fluid into the system to replace whatever air is
there. The drawback of this approach is that it spews corrosive brake fluid
into the car through the vent hole in the master cylinder (this is because you
have the reservoir fill cap off and fluid pops up through the hole). Once again
you might be able to get it to work with a friend, but I’d be wary about
damaging your paint.
You know I love step by
step instructions, so here’s how this works:
1.
Fill the reservoir with
fluid up the bottom of the cap threads;
2.
With one hand get under
the car and crack the bleeder with an 8mm wrench
3.
Slowly and deliberately
pump the brake pedal with your other hand. Yes, you can actually do both of
these things at the same time by yourself as a one person operation (although
your
back may object)!
back may object)!
4.
Close the bleeder valve
5.
Repeat the Open-Pump-Close-Release
cycle twice
6.
Refill the reservoir
with fluid (you can only get three full pumps before you risk emptying the
reservoir)
7.
Once you are only
pumping fluid, pump a couple of cycles to be certain that there is no air left
in the system.
 |
| Add Fluid to Bottom of Screw Threads |
You can verify that
there is no air in the system by giving the brakes a good pump and holding he
pedal down. If the pedal continues to sink you either have air in the system or
a fluid leak.
With the brakes bled you
can start on the wheel adjustment. The goal here is to have both front wheel brakes engage
at the same time.
With the car still
raised turn one of the wheels. You should not hear any rubbing sound. Now use a
flat bladed screwdriver to expand the adjusters on the wheel cylinder until the
pads start to scrape against the drums. You do this by sticking a screwdriver
in one of the access holes and turning it either up or down. Use every bit of
spatial knowledge you have to figure this out. Since it always confuses me I’ve
supplied a cheat sheet below on which way to turn them:
From under the car:
- Top hole: Push the adjuster up (or to the right) to back off the adjuster.
- Bottom hole: Push the adjuster to the left to back it off
Right wheel:
- Top hole: Push the adjuster towards the back of the car to back off the adjuster
- Bottom Hole: Push the adjuster towards the front of the car to back off the adjuster
 |
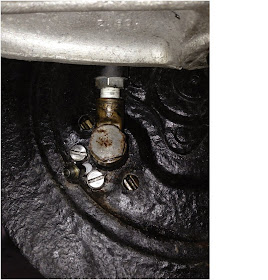
| Slots in brass adjusters can be seen through holes |
The instruction manual
says to start with the “leading” shoe, I have no idea what that means nor has
anyone been able to tell me, so I adjust the bottom ones first.
Turn the adjusters until
the brake shoes make a noise, then back them off just enough so they are silent
when you turn the wheel. This is why absolute cleanliness and easy operation
of the adjusters is key; it will be impossible to turn the adjusters if they
don’t already move easily when you install them in the car.
Do this on both wheels,
now go out for a drive. As you drive pick a spot where you can press hard on
the brakes. The car should not pull to one side. If it does, that means the
side that is pulling is overadjusted, You may have to fiddle with it a bit, but
that’s the essence of brake adjustments.


No comments:
Post a Comment