My summer project is to rehabilitate the body of my second
Heinkel car. This will be no small task since the car needs floors, sills,
wheel arches, door tube, louvers, roof rails, and a gas tank supporting panel.
In other words, it needs a lot of work.
To outsource this kind of work is not
really economical for me, so I’ve decided to do it myself.
 |
| My second Heinkel Car |
Since my welding experience is very limited I decided that I really needed to get much better before I attempted anything that big and with places where my inexperience would be obvious. So, I decided to make a set of cooling tins for my engine.
 |
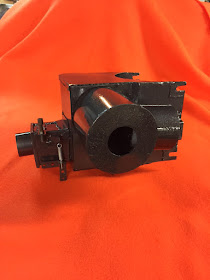
| Heinkel Engine Cooling Shrouds |
Cooling tins are not reproduced for 200cc cars. Close
inspection of them shows why: The left hand shroud has 25 separate pieces, a
cable-actuated heater gate, and a variety of curves, holes, bends, and welds. I
brought one I had to my local tinsmith for an estimate and he gave me one of
those looks that said “if you have to ask you can’t afford it”. I got to thinking that it really was a
microcar in microcosm; lots of little pieces that have to fit together in a
certain way and will require a lot of fidgeting.
Step 1: Reverse engineering
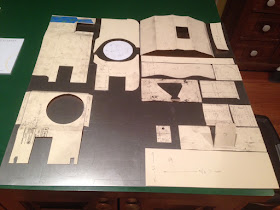
I couldn’t find a plan for making cooling tins, so I looked
at my original and decided to reverse engineer a copy. I made components out of manila
file folders. Manila file folder material is easy enough to get, relatively
easy to cut, and is sturdy enough that I could use it to craft a 3D
prototype.
 |
| Cardboard Mockup of Heinkel Shroud |
Step 2: Steel:
I decided to use 22 gauge steel to fabricate the pieces (gauge
refers to the number of pieces stacked together that it takes to make a one inch high
pile). I went on line to Amazon.com and had the steel in 2 days. I could
fabricate the entire cooling shroud out of 4 square feet of steel.
I purchased a 2 foot square piece. In retrospect I would
have purchased a 1x4 foot piece. I’ll explain why in a minute.
Step 3 (really step 1!): Tools:
I forgot to mention that this project is a good opportunity
to buy some tools? If you’re going to fabricate body panels you can go
overboard on tools. Just go to Eastwood.com and look at some of the things they
sell there.
Unfortunately a lot of metalworking tools are too big, heavy, not portable, and expensive for a hobbyist. I decided on snips and a 3 in 1 metal machine to do the tasks required.
 |
| 3 in 1 Brake Shear Roll Metal Machine |
The snips let you cut straight, left, or right. Left and
right refer to the direction the waste falls off (or curves around) when you
cut your metal. The reason I should have purchased a 1’ wide piece is then I
would not have to cut a 2 foot piece. Snips are good for small cuts and not
long pieces.
 |
| Snips- usually they are red (left) yellow (straight) and green (right) |
Step 4: Cutting, Bending and Shaping the Metal:
I learned quite a bit here. Rule #1: cut as little metal by
hand as possible. It is extremely difficult to cut a straight line with a good
edge using snips. Snips do well if you
are cutting small straight cuts or curves. Either way you need to look out for
hanging edges that will slice your fingers.
The 3 in 1 is actually a lot of fun. It’s pretty easy to cut metal once you get the hang of it. Clean bends are easy, and rolling circles is a piece of cake.
I referenced a sheet metal fabrication book in order to make my round piece transitions. For the air deflector I cut a circle in the main piece, and then cut a wavy edge in the second and everything lined up pretty well. I also experimented with making a “square to round” transition for for heater takeoff, but the 22 gauge metal and small sizes were difficult for me to work with. I came up with a pretty good solution though.
Step 5: Welding:
This was what I was hoping to practice on. I had to do a variety
of joins including right angles, lap joints, and butt jointing. I decided to
tack everything first and then go back and try to lay down some nice bead lines.
Like anything else the beginning welds were not so
attractive. I eventually did pretty well and by the end I was able to make some decent beads. I have a new appreciation for what takes to lay down a good
weld.
Step 6: Grinding:
 |
| Not the best welds but they will do! |
I used the grinder to clean them up the ugliest of the
welds. There are some tricks to learn
with grinding too. I never knew you were
only supposed to grind at right angles to the work.
Step 7: Constructing the Heater Gate:
I had to add some extra pieces to replicate the gate. I used
an angle iron as it was about the right thickness of the original, then I
drilled extra holes for the springs and the cable holder.
Step 8: Paint:
I used hammered paint. The originals seem to have come in a
bunch of colors, but I used hammered black since it helped cover up some of my earlier
mistakes.


No comments:
Post a Comment