I rebuilt several engines over the winter and wanted to test
them before I installed them in vehicles. I’ve confidently tried just putting an engine in
a vehicle, thinking it would work flawlessly, but of course after spending an hour installing it I found it needed
to come out to fix a leak and an ignition fault. Building a test rig takes time,
but it’s easier in the long run than installing, uninstalling, and reinstalling
engines.
This rig will work for a car or scooter. You’ll need to
construct an engine holder and to simulate the vehicle’s electrical system. The
first is easy to do with scrap lumber and drywall screws. The second isn’t hard
once you understand the concepts of the ignition system.
Part 1: Wood Frame Engine Holder:
 |
| Wooden Frame, Rollers for a Heinkel Engine Test Stand |
Part 2: Electrical System:
You need to simulate the action of the Heinkel ignition
switch. You need one switch to complete the circuit to the coil and a button
(or a switch to turn on and off) that sends a pulse of power to the dynastart
to turn over the engine. You could connect a spare ignition switch, or use two
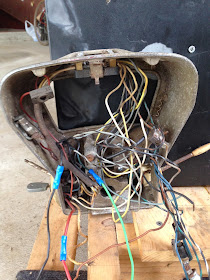
switches you have around (you can even use household light switches). I had an old dashboard around that someone had taken out of the car but left all of the important wiring in place. I've drawn the diagram below and asked two people to review it, so I think it's pretty accurate. This shows a set up for a
Bosch Control Box.
 |
| Wiring Diagram for Heinkel Test Rig |
Part 3: Connecting the Engine to the Rig:
There are four considerations here:
- Attaching the engine
- Battery
- Gas Supply
- Grounding (earthing) the gas tank and electrical system
- Attaching the engine: The easiest way to do this is to use zip ties to secure the engine. I attached one around the swingarm and one around the engine mount. For a car engine without the motor mount I just daisy chain together zip ties until I can secure the engine.
Look Closely to See Zip Ties on Engine Mount - Battery: You can use a car or scooter battery. You can even use a much smaller battery (I used one with 4 amps starting power from Wal-Mart). If you are going to run the rig for some time you can zip tie the battery to the rig or make a holder.
Heinkel Test Rig Showing Battery and Electrical Components - Gas Supply: I made an upright and got an extra long piece of fuel hose. The purpose of the upright was to suspend the gas supply above the engine and let gravity feed fuel into the carb. After some experimentation I used a squeeze bottle as a gas "tank", and attached the gas hose to the end. I also put a small vent hole in the middle of the bottle so the gas flowed freely. I tried using a plastic bottle with a fuel cutoff switch but had some issues with leaking. This method is much simpler; if you want the flow to stop just lower the bottle onto the ground (with the vent hole facing upwards) and the engine will stop after any gas in the carb is consumed.
Upright to hold gas tank. I later modified this with another type of bottle to prevent leaking fuel. I left a space for the wheel in case I ever wanted test the gears - Grounding: It is also important to ground (earth) the gas supply to avoid static electricity flash fires. I wrapped wire around the tank and upright to do this. There may be more effective ways; if you have any suggestions please let me know. To ground the electrical system I used a car grounding wire, but also attached all of the electrical components to a common metal backplate (in this case from an old gas grill I was throwing away). Key grounding points
are the control box, coil, engine, and battery.

Old Dash used for switch wiring- ugly but effective!
What to Test:
What do you test in a test rig? There's several things that are worth testing. Here's my list:
Possible Improvements:
The rig does not accommodate testing the gearbox or clutch. My feeling on those was that they were pretty straightforward with not a lot to go wrong. Plus, both of these items need adjustment once they are installed in the final vehicle, so it would be a duplication effort to test them here.
What do you test in a test rig? There's several things that are worth testing. Here's my list:
- Test for leaks. As you know, Heinkels leak from lots of places. This is a good chance to see where they are and fix them relatively easily.
- Set the Timing: You can set the timing of a Heinkel while it's running. It's way easier here than when it's installed in a car.
- Carb Adjustments: If you get the engine warm enough you should be able to adjust the carb. Carb adjustments are another whole topic.
- Re torque the head: If you are off of a fresh top end rebuild you should re-torque the head. after about 20 miles. I don't think that's a hard and fast number; I believe the goal is to go through a heatup and cooldown cycle. After running the car for a bit and letting it cool down you should be able to re-torque the head to 22psi.
Possible Improvements:
The rig does not accommodate testing the gearbox or clutch. My feeling on those was that they were pretty straightforward with not a lot to go wrong. Plus, both of these items need adjustment once they are installed in the final vehicle, so it would be a duplication effort to test them here.


No comments:
Post a Comment